Thursday, August 9, 2012

SMASH* Book - Happy Mail

Hello!!!!!

I am sure you are tired of hearing this statement, but for the benefit of first time visitors (Hey!! BTW :D)....My scrapping took a major hiatus over the last few months due to me starting work....I have recently stopped working and am slowly managing to get back into all the bits and pieces I have wanted to do for ages!!!

I fell in LOVE with the SMASH books when I stumbled on a the K&Co video on them....who wouldn't fall in love with the idea after watching that!!!!

I hopped straight onto their website with full intention to order ONE book and a few accessories.....I THINK NOT!!  I couldn't decide on which book to buy, so I got the Pink one (Pretty Style), the Black one (Mod Style) AND the Mini Book....

I got them in May and have dabbled a bit with a page here and there, but haven't really SMASH*-ed the way I was hoping.  I have been hoarding the "things to smash" in a plastic folder, and it was BURSTING at the seams.  I decided it was high time to get SMASH*-ing.

I didn't dive into decorating the cover, I wanted to see where the book was going before doing it...I got a few Pandora Charms for my birthday and kept the ribbons that the boxes come tied up with, as well as the ribbons that secure the charms in their little boxes.  These proved to be perfect to tie on to the front cover.......**HAPPY PLACE**.  I added a stamp from SwissGirl Designs - Dream Real Big set with the quote "Follow Your Heart".  Appropriate for my idea of this SMASH* book :D


I recently went on an Etsy Shopping spree and kept the envelopes the goodies came in.  I cut out the customs label and stamps and added them to the book under the title of "Happy Mail"  There is space for a couple more of these, thank goodness because I have yet ANOTHER shipment of washi tape on it's way from Hong Kong.....*happy dance!!*


As I add to the book, I will post some of my favorite pages :D

Happy SMASH*-ing!!!

Jo

Tuesday, August 7, 2012

PROJECT LIFE - "Week 3"

Today I would like to share Project Life - Week 3 with you.  I have had a lot of fun playing with page protectors with different size pockets, but I think I personally still prefer the old 2, 4, 2 layout....


Left Page:

Right Page:


And here is a closer look at a couple of the days :D

Just an amazing day!!  My daughter was in a gymnastics display at school.  Their routine drew gasps of amazement and cheers of joy from the audience.  It was a tear maker moment :D


As an expat living in Dubai, I really miss some of the things you find "back home".  I was super excited to find this orange drink in our local supermarket!!!  It totally earned the spot of "photo-of-the-day" for me :D


It would appear that a lot of Project Lifers often say they are falling behind.  Having fallen behind myself, OFTEN, I just want to add a spot of encouragement for those who are perhaps feeling a bit despondent about being behind....Don't stress it.  Its not something you are going to be judged by or get graded for....If you are months behind and just are not able to make up the weeks....just start again from today....

Happy Scrapping

Jo


Saturday, August 4, 2012

HIPSTA Love

Hello, hello!!!

A few weeks ago, I started using Instagram a bit more, and just LOVE the photos.  I was browsing through Becky Higgins blog and saw her post on her recommendation for iPhone Apps.  Amongst them was Hipstamatic.  I decided to take the leap and download the App onto my phone.  OH MY GOSH!!!  I ran my battery flat in about 2 hours just happy snappy-ing anything and everything in site, using all the different films and lenses and flash options.  I am totally in love with this App.

The next day I had a look at the add ons for the "camera" and bought the America HipstaPak.  This included a new lens, 2 new films and a turquoise camera case...(yes, it's all virtual BUT is still fun to do :D).  I had to do a layout on my new "camera"......


I literally threw this page together in about 20 minutes and it is one of my favorite pages at the moment.  

I used paper from a 6" x 6" paper pack by Basic Grey called what's up and some scraps from a Kaiser Craft 6,5" x 6,5" called Humming Bird.  (what I cut off when sizing the pages to fit my PL album).  I added a scallop butterfly tag and the clouds from the Paper Inklings Bright Day die cut sheet and finally some strips of washi tape.  For the title I used Amy Tangerine Thickers called Goodness and added a little punched out heart.

I would like to share with you my personal choice Apps which can be used as a great tool for scrapbooking....


Instagram is a free app and offers many different preset options for pictures.  It is also a mini social network where you can share photos with others on Instagram.  Photos can be shared to severals social networks

Next up is Hipstamatic.  Well, this is a beauty where you can choose your option of lens/film/flash combos to create your very own custom looks.  The App costs $1.99 and comes with several different lenses and film options.  You are also able to buy add on lens/film/camera/flash packs from $0.99.  Photos can be shared to several social networks

BeFunky is a free or Pro App. You can add effects and frames of all kinds to your existing photos.  Photos can be shared to several social networks

iQuickDoF is available in free or Pro is a Tiltshift lens and is great for playing around with your photos to create depth of filed images on your existing photos.

InstaCollage is available in free or PRO and is a great app to create photo collages of your photos and print or share to other social network.

Collage is a free App and allows you to create fun collages.

At this point in time my iPhone is my most useful scrapbooking tool around.  I am amused at the fact that I have been striving for the most pixel per inch, highest definition cameras which offer the most crisp clear photos for years, and now I am, striving for the most vintage looking, grainy photos I can, using my "state of the art" technology....Oh, forever wanting what we don't have :p

Keep Crafting!!!

Jo

Thursday, August 2, 2012

PROJECT LIFE - Journaling Cards

Hello!!

Today I would like to share some Project Life journaling cards I made a little while ago.  My daughter was attending the Creative Camp at Creative Hands, and silly me left our photographs at home.  FIRST TIME EVER that has happened.  I couldn't believe that I had done this!!!  Amy was okay because she could do her page and add in photos later, but I was totally stumped...How to update PL without your Photos.  Feeling red faced and hugely annoyed with myself, I decided to embellish a few blank journaling cards to add for my stash.


I started by trimming down the grid index cards I bought from Daiso to the correct size (I love Daiso!!!).  Next I reached into my bag of bits and pieces and added die cut labels and shapes, washi tape and some punched out tags.

Now I have some hand embellished journaling cards to reach for which will help cut down on the time I update Project Life.

Happy Scrapping!!

Jo

Tuesday, July 31, 2012

PROJECT LIFE - "Week 2"

Welcome back for the next installment of Project Life.  This is the week of June 12-18 Twenty 12.


 Week 2 - Left Page:


Week 2 - Right Page:


I didn't have a photo for today, but did get this quote off Facebook.  My best girl friend lives in Miami now, and I don't get to see her as often as I would like.  We were inseparable at high school and often went months without being apart for a day.  She moved to the UK, then on to Miami and I moved to Dubai.  We have the sort of friendship that is not awkward, no matter how long we spend apart.

Last summer, I went to visit her in London, and on our first day, we went to Spuntino in SoHo....This picture just reminds me of the two of us at the counter eating pork sliders :D:D:D  Happy memories.


This was a happy day for our family.  My daughter got 2nd place overall in her gymnastics competition.  She did so well and we were so proud of her :D


There were quite a few photos I wanted to showcase for this day, so I repurposed a PL page protector.  I separated the for 4 x 3 pockets from the rest of the page and attached them to the journaling pocket on the page.  I used a concertina fold to layer up the photos.  This is the "inside" of the pull out section.


And here is the "outside" of the pull out section.  I added the score sheet to the remaining two empty pockets.  I secured the "mini" album using postage bakers twine, which was attached to the page behind using buttons.  I just tie it in a bow and it keeps the added insert from flapping around :D:D


I wanted to use this photo in its entirety.  We have an endless friendly argument in my house as to why we eat our meals at the kitchen breakfast nook, as opposed to the dining room table.  My argument is that the dining room table is used as a store it place for everyones stuff they are too lazy to take upstairs...I love my husband with all my heart, and he has many great qualities...BUT, he always insist none of the stuff on the table is his...Today I got photographic evidence of his stuff on the table :D:D  I think that is now a moot point in my house.


I will be doing my best to post a new PL update every Tuesday.  Fingers crossed and all that, see you next week for a PL update :D

Jo


Sunday, July 29, 2012

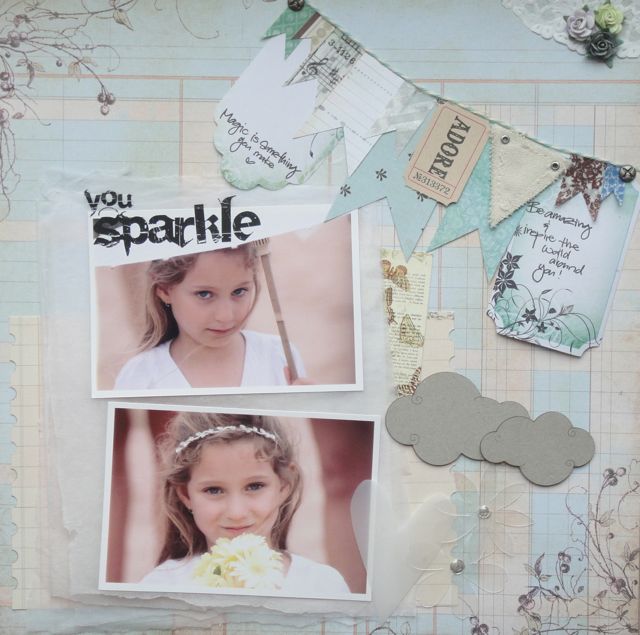
Scrapbook Layout - You Sparkle

I really enjoyed scrapping this page of my daughter.  The photo was take at a family wedding in March of this year.  Amy was a flower girl.  As you know, I have been entrenched in Project Life recently and it was a nice change to scrap on a page more than 4" x 6" big :D (Don't get me wrong, I am LOVING crating mini scrap pages for my project life) - It was just different to embellish with larger bits and pieces :D


I had tons of fun with this page, using supplies from but not limited to - Prima, SwissGirl Designs, Paper Inklings, Kaiser Craft, Tim Holtz.


It was so much fun making this banner out of paper scraps, tags and washi tape.  I stamped on the two bigger Kaiser Craft tags using the "Dream Real Big" stamp set from SwissGirl Designs.  I really love all her stamps and one of my best things about them is that they are one of the few acrylic stamps that work well with Tim Holtz Distress Inks....


Added some acrylic elements.  The flowers are REALLY OLD Maya Road stash that I recently rediscovered during one of the many crop room clean outs I have done recently.  The heart is cut from a 2L milk bottle which i washed out, let dry and then up-cycled :D:D.  The lovely chipboard clouds are from Paper Inklings.


I recently made a huge paper purchase from Paper Inklings in Australia.  They have the most awesome rub-ons and chipboard embellishments (not to mention the totally yummy paper too).  I used the "You Sparkle" wording from the Fairy Princess rub on set.

I layered some white tissue paper under the photograph.  I have recently seen Rahel from SwissGirl Designs do this on a couple of her layouts and I love the soft feel it gave to the page...Thanks Rahel for ALWAYS inspiring me :D:D

Thanks as always for stopping by :D:D

Happy Scrappping!!!

Jo


Tuesday, July 24, 2012

Project Life - "Week 1"

Hello friends....

I have had a very hectic few weeks.  I decided to use the first part of the summer holidays to do a mini home makeover.  I have had almost the whole inside of the house painted, and sold all my son's bedroom furniture and bought all new items more age appropriate for a young man of 10 years old :D.

After managing to catch up from being 5 months behind in Project Life, I found myself about 3 weeks behind due to the madness of the end of year at school (I was working as an LSA, then as a TA at my children's school).  I enrolled my 7 year old daughter in Creative Camp at our local scrapbook store, Creative Hands, and used the sessions she was crafting to sit in store and catch up on Project Life.  I am once again caught up, but have no doubt that I will fall behind again as this seems to be the way of Project Life...falling behind and catching up seems to be a catch phrase of Project Life...That is part of its charm for me :D

Thanks to my mad record keeping skills (see my post on falling behind, catching up and organizing by clicking HERE), I have managed to catch up with very little hassle.

My Project Life runs from June - May, an academic year as I decided to start Project Life last year in May, and not being one to wait, I started cracking on as soon as my goodies arrived from Amazon.  June this year marked the start of my second year doing Project Life.  I would like to share my opening pages, as well as the first week for this "year".


I made a date opener in an A4 format.  This is something new from what I did last year.


I used some printed paper, cut to size on the front page protector.  It just houses some quotes and I wanted it to reflect the feel of what my PL will be this year...


Left page of the first week.  


Right page of the first week.  


I used a calendar I got from a free printable for the first page of the month.  I run my PL monthly rather than weekly.  This way I don't have to worry too much if I don't have a photo a day and then have plenty blank pockets which need filling, or if I have additional photos and need to use more than the allocated 2 pockets for pictures.  I used a grid glassine bag which I ordered from Michelle Wooderson's online store, some wash tape and a home made tag as embellishments.


My husband recently returned from a trip to Tokyo and came back bearing rolls and rolls of Washi Tape.  He certainly knows that the way to my heart is through stationery :D


This was a no photo day (gasp, shock, horror) so I used some banter off Facebook to tell the story.

So that is it for "Week 1" (June 3-11 2012) of my Project Life so far....I have pinned all the free printables I have used on PL to my Pinterest page, which you can find HERE.  

Keep creating :D:D

Jo