I love a pretty notebook. I have notebooks and planners EVERYWHERE, and they all have a different purpose. A notebook in the kitchen for writing down, well, things - one in my craft room for jotting down my "To-Do's" and notes on projects/blog posts - A Project Life planner, a Blog Planner and my day to day planner (yes - 3).
Today I would like to share a notebook I was asked to do a tutorial on for Pretty Paper Studios. I feel this would be nice as a gift (teacher's for example) or just to have around for your daily notes...
YOU WILL NEED:
2 sheets 6"x6" printed paper for the cover, embellishments and chipboard letter of your choice along with :-
1 2
2
 2
2
1. 2 pieces of chipboard, cut to 6"x4 1/2".
2. 30 sheets of grid paper, taken from a store bought notebook, and cut in half (6"x4"). PLUS 2 untrimmed sheets for inside covers.
3 4
4
 4
4
3. 3 pieces double sided printed paper/cardstock, cut to 6"x4".
4. 3 pieces 6"x4 1/2" printed paper/cardstock.
5 6
6
 6
6
5. 3 pieces 8"x8" printed paper/cardstock to be used as pocket pages.
6. Assortment of tags. 3 tags, 6"x3" to be inserted in pockets, and 2 tags, 4"x2".
HOW TO MAKE IT:
7 8
8
 8
8
7. Take your 3 pieces 6"x4 1/2" printed paper/cardstock (POINT 4), and measure half an inch in from the right hand side. mark the first the sheet at 2" and the second at 4".
8. Discard areas marked with black lines in the picture. Leave the third page.
9 10
10
 10
10
9. You will be left with 2 page dividers.
10. Using one of the 8"x8" sheets, fold it in half and mark as show on the picture above. (Click here to link to a larger image).
11 12
12
 12
12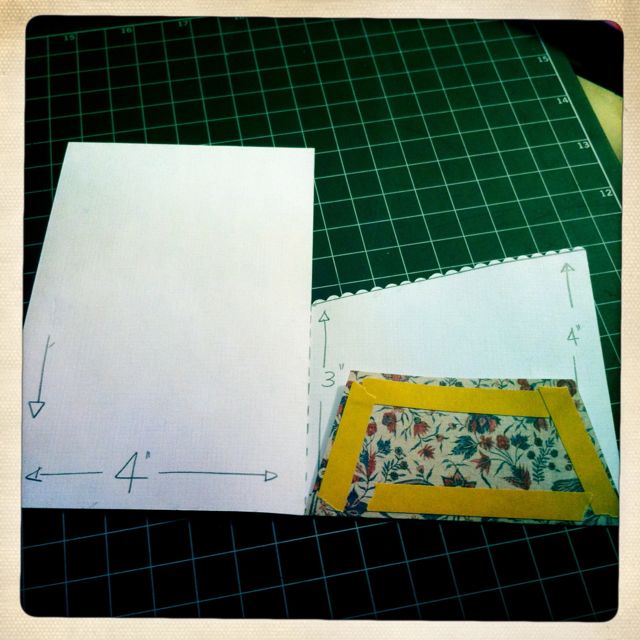
11. You can use a decorative scissors to cut the pocket opening as I did here. You can also alternate the opening from the right (shown here) to the left side so that your pocket opens on the other side.
12. Adhere the flap to the inside of the alternate side of the tag.
13 14
14
 14
14
13. This is the completed tag. Repeat the process for the remaining 2 pieces of 8"x8" paper.
14. Arrange your elements as follows: first divider page, tag pocket, 10 sheets note paper, 1 sheet 6"x4" printed paper, 10 sheets note paper...repeat.
15 16
16
 16
16
15. Add the small manilla tags where desired.
16. Cover the inside covers with grid paper, and cover the outside with the printed paper, folding over the small overhang to the inside of the book.
17 18
18
 18
18
17/18. Embellish the front cover as desired. Here attached a punched tag to the bottom right, over which I attached a strip of printed paper, then a strip of Washi Tape. I used chipboard Thickers for the title. You could personalize the notebook by using a person's name.
19 20
20
 20
20
19. Bind using your preferred method. You could ring bind it yourself or take it to a local stationers where they could do it for you, or you could bind it using O-rings (binding rings).
20. A flip through, I added my 2 manilla tags at the front of the notebook.
21 22
22
 22
22
21. One of the pocket pages. In this instance, the pocket is on the reverse side.
22. Pocket page with tag inserted.
Thanks for joining me on this tutorial. I would love to hear from you, so please leave a message in the comments section :D
Happy Scrapping!!
Jo
No comments:
Post a Comment